
Where to find them
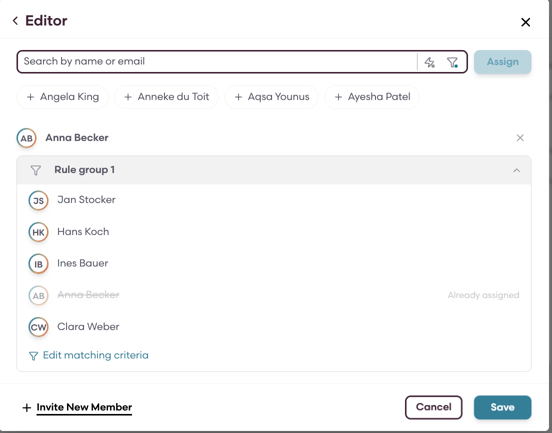
Both are configured from the member assignment panel of a document or activity:
- Open the document or activity.
- Click the + next to the member avatars at the top of the record.
- The assignment panel opens, listing each access role: Owner, Editor, Approver, Reviewer, Viewer.

Every role row carries two icons, and each role is configured separately:
- The funnel icon opens Matching Criteria for that role.
- The lightning icon opens Automations for that role.
A small dot on the icon tells you the current state at a glance: green means logic is configured and active, grey means logic is configured but not currently active, and no dot means nothing has been set up yet. Matching Criteria only ever shows green, because criteria are active as soon as they are saved.
Matching Criteria
Matching Criteria lets you assign everyone who matches a defined set of member attributes, instead of picking people one by one. Because the rules are evaluated against live member data, the assignment keeps itself up to date, when someone joins a department, changes position or receives a tag, they are picked up automatically.
What You Can Do With Matching Criteria
- Assign members by Department, Position, Division, Role or Tags.
- Combine several rules into a rule group, and add multiple rule groups for alternative conditions.
- Set the access level and the scope separately for each rule group.
- Rename a rule group and give it a description so colleagues understand what it is for.
- Duplicate or delete a rule group.
- Preview exactly who matches before you save.
How Matching Criteria Works
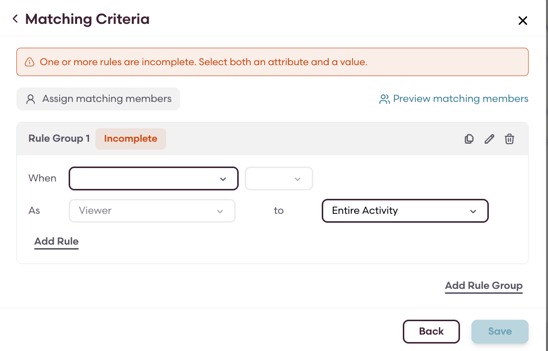
A rule is made of three parts: an attribute, an operator and a value. For example Department Equals Quality Assurance. All rules inside one rule group have to be met together, so a group is how you narrow a selection down (department and position). Separate rule groups act as alternatives, so a member is assigned if they satisfy any one of the groups.
Each rule group ends with its own assignment sentence; As [access level] to [scope], so one group can grant Editor access to the whole activity while another grants Approver access to a specific step.
Set Up Matching Criteria
- Open the criteria builder
- Click the + next to the member avatars to open the assignment panel.
- Find the access role you want to configure (Owner, Editor, Approver, Reviewer, Viewer).
- Click the funnel icon on that role. The Matching Criteria screen opens.
- Build a rule
- In Rule Group 1, open the When dropdown and choose an attribute: Department, Position, Division, Role or Tags.
- Choose the operator in the second dropdown, then enter or select the value.
- Click Add Rule to add further conditions to the same group.
- Until both an attribute and a value are selected, the group is marked Incomplete and the banner "One or more rules are incomplete. Select both an attribute and a value." stays visible.
- Set the access level and scope
- On the As … to … line, choose the access level for the matched members.
- Choose the scope — the entire activity, or a specific section or step.
- Check who matches
- Click Preview matching members to see the members the rules currently resolve to.
- If nothing matches, Playbook shows "No members match the current criteria" — adjust the rules and preview again.
- Organise your rule groups
- Use the pencil icon on the rule group header to give it a name and description.
- Use the copy icon to duplicate a group, or the trash icon to remove it.
- Click Add Rule Group to define an alternative set of conditions.
- Save
- Click Save. The criteria take effect immediately and stay active.
Automations
Automations assign members based on the content of the fields in a document or activity. You define a trigger, a condition on one or more fields, and the action that should follow when that condition is met. This is what routes a record to the right people as it is filled in: an asset in a particular location goes to the local maintenance lead, a high-risk entry picks up an extra approver.
What You Can Do With Automations
- Give each automation a name and description so its purpose is clear.
- Trigger on the values entered into the fields.
- Combine conditions into rule groups, and add multiple rule groups.
- Assign specific members, or assign members via Matching Criteria; an automation can use both.
- Set the access level and scope for each action.
- Add several actions to a single automation.
How Automations Work
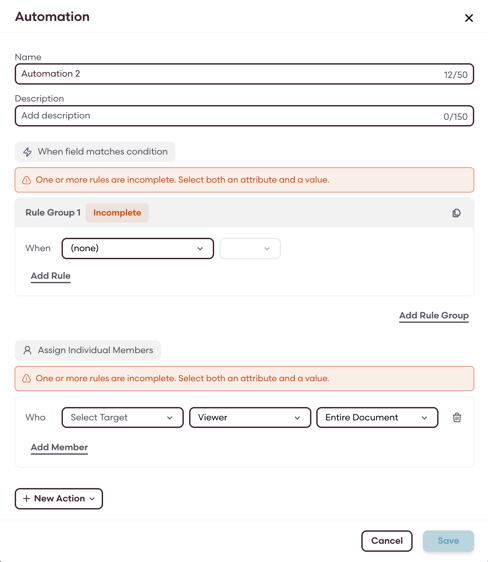
An automation follows a when → then structure. The when is a condition on a field, built the same way as a matching rule: field, operator, value. The then is an action that grants an access level to selected members, either at the level of the entire document or on a specific step.
Conditions are evaluated against the fields as it is filled in, so an automation applies as soon as its trigger value is entered. Multiple rules in one group must all be met; multiple rule groups act as alternatives.
Set Up an Automation
- Open the automation builder
- Click the + next to the member avatars to open the assignment panel.
- Click the lightning icon on the access role you want to configure.
- Create a new automation or open an existing one.
- Name your automation
- Enter a Name (up to 50 characters).
- Add a Description (up to 150 characters) explaining what the automation is for.
- Define the trigger
- Under When field matches condition, open the When dropdown in Rule Group 1.
- The dropdown lists the fields, grouped by section, for example, under Asset Details you will find Equipment Name, Asset ID / Tag, Location and Last Calibration Date.
- Select the field, then choose the operator and enter the value that should trigger the automation.
- Use Add Rule for further conditions in the same group, or Add Rule Group for an alternative trigger.
- Add the action
- Click + New Action and choose what should happen.
- To assign specific people, use the Who row: select the target member, the access level (for example Editor), and the scope (for example Entire Document). Click Add Member to add more people to the same action.
- To assign by attributes instead, choose the matching-members action. This opens the Matching Criteria screen, where you build the rules exactly as described above; Back returns you to the automation.
- Add as many actions as the automation needs.
- Save
- Click Save. The automation runs whenever its conditions are met.
Beyond documents and activities
The same two builders appear wherever members are assigned in Playbook, including template defaults, training programs and events, and resources. The rule builder, rule groups and Preview matching members work identically in each; only the available scope options differ according to the context.
We hope this helps! Please reach out to our customer success team for further questions.